Every now and then I stumble across a feature on a website that I can’t believe I haven’t seen before, this time it’s Grind TV’s How I Got The Shot, and there’s a fair bit of content there that is going to be useful for learning surf photography.
Here’s a quick list of the features that will be relevant for aspiring surf photographers:
- Brent Bielmann – Catching fire with surfer Bruce Irons – Underwater photo featuring a flare attached to Bruce Irons’ board.
- Chris Burkard – Dane Gudauskas surfs Norway’s frozen waters – A pulled back action shot taking in Norways stunning landscape
- Dave Chami – Skateboarder Walker Ryan takes flight – It’s a skate shot, but he uses an SPL housing and large dome port to shoot an over/under style photo, and there’s a nice video with an interview and plenty of behind the scenes footage too.
Check out the links above, the Chris Burkard one is pretty good and features his trademark pulled back angle, they go into quite a lot of detail about the gear used too, interestingly he shot it with a 70-200mm f2.8 at 90mm at f8, so it’s something most photographers could technically accomplish with budget gear, this fact serves to highlights the commitment and creativity of the surfer and photographer that goes into making a really great image.
Brent Bielmann’s shot is a sick photo, there’s less details about the gear within the post itself, so I took advantage of the Exif viewer shortcut that I installed recently (read my post on Exif data to learn more) to find out a lot more info.
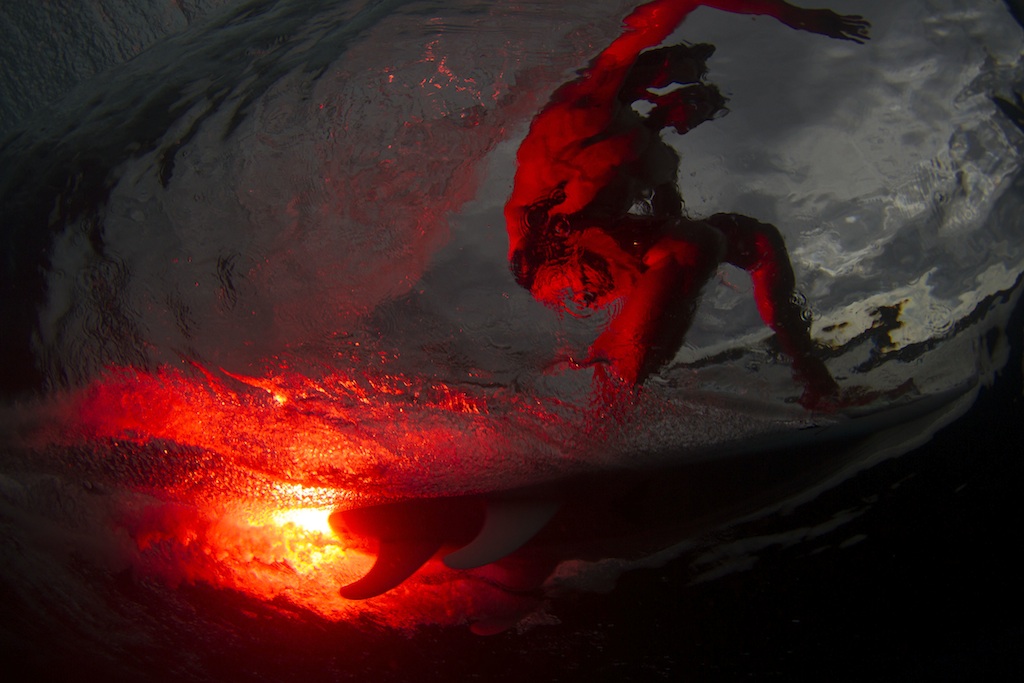
I discovered that it was shot using a Canon EOS-1D Mark IV, using the same fisheye I use, the Tokina 10-17mm (weirdly it says in the post that he used the Canon 8-15mm fisheye, but the Exif data also says it was about two and half years ago so he’s probably upgraded since then) set to 13mm, in Shutter Priority mode, the ISO was 400, shutter speed was 1/1000 of a second, the camera chose an aperture of f8.
The EOS 1D Mark IV has an APS-H size sensor, meaning it’s bigger than the Canon 7D’s (and 60D, and 70D, and all the X00D series) APS-C sensor but not quite full frame, the crop factor is 1.3, so I expect he’s zoomed it in to 13mm because otherwise it would vignette in the corners, basically 13mm on his camera is equivalent to 10mm on my 60D.
I accidentally had mine set to 11mm the other day and the shots came out pretty good, in the Exif data you can see that the maximum aperture available to the camera was f4, I still had f3.5 as the max aperture though, so I guess either 12 or 13mm is the point where it steps up to f4 on this lens.

The other thing that I was interested in when looking at the Exif data was the exposure compensation setting of -3, I must confess that I’ve only used exposure compensation very briefly when taking some silhouette landscape shots, I know it’s a good idea when shooting in one of the semi automated modes when you want more control over the final image.
In this case the camera would have tried to compensate for the lack of background light by over exposing the dark areas of the image, the reason this image is different and works well is the small area of very bright light from the flare, and it’s reflection on the surfer, and the surrounding darkness, so setting it up with -3 exposure compensation makes the camera aware that you want to preserve the darkness in the majority of the shot.
I’ve just received my very cheap slave flash so hopefully I’ll be experimenting with using it with my water housing once I get it to a user friendly stage, and I’m sure it will involve exposure compensation, so in the future I’m sure I’ll touch on the subject a lot more.
Check out some of the related articles below for some more inspiration and keep tuned for some more in depth tutorial style posts in the near future.
Leave a Reply