This is the last part on flash photography in surf for now, I have got a new project which is coming together nicely at the moment and should allow me to get some better in-housing flash shots in the future, as soon as I’ve figured it out I’ll add another post.
In Part 1 I showed you my pistol grip water proof flash housing and in the video I showed you how I have used this with my Canon 60D in my Aquatech CR-60 housing, this post will explain in a bit more detail how I squeezed the Yongnuo RF 603 transceiver inside and some observations on the technique when shooting with the set-up.
The Pro Gear
First you’ll need a water housing with some sort of flash connectivity, a lot of manufacturers offer this type of rig, sometimes it’s built in to the housing and other times it involves a separate flash housing and a bulkhead or waterproof socket for a cable to attach the flash to the camera.
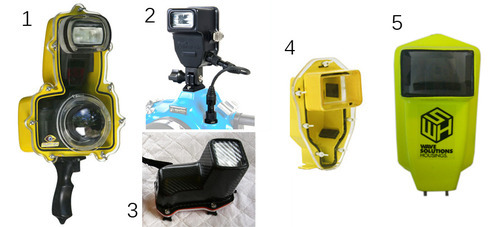
- Liquid Eye C1900F, fits the majority of Canon EOS DSLR’s and the 580EX flash.
- Aquatech mini flash housing features an Aquatech flash, housing and cable which will work with their less basic housings with a bulkhead.
- CMT Detachable flash housing, carbon fibre lightweight flash housing that is secured via bolts on the bottom
- SPL flash housing, attaches to the top of an Aluminium SPL housing with a wire coming up through a hole in the housing, sealed by an o-ring.
- Wave Solutions Housings flash housing, custom made in Portugal these fibre glass housings look really nice.
All of these are going to set you back a few hundred pounds, but if you’ve got the cash and a housing that will support them they are all good options and will let you use your flash on your housing.
The Budget Option
See Part 1 for the how-to on building the flash housing and getting the cheap radio trigger inside there too.
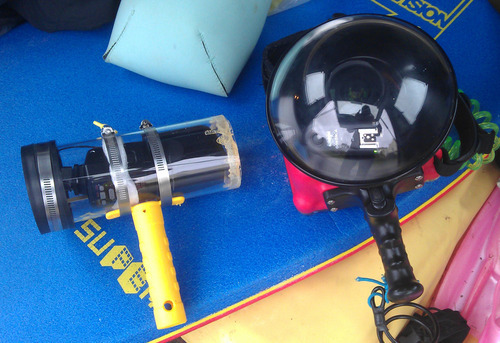
Now the challenge is getting the radio trigger inside the housing with the camera, there’s not a lot of room in there at all, with my housing and lens port combo I have a little bit of room in the dome port with my Tokina Fisheye lens, you might be able to find space in the housing itself if it isn’t such an exact, tight fit like mine.
Once I realised the trigger would sit inside the port OK I had to attach it to my cameras hot shoe, there’s very little space at the top of the housing so I needed to get a low-profile cable that would fit in.
You can’t buy a small enough cable off the shelf so I bought a cheap one from Amazon and modified it to fit.
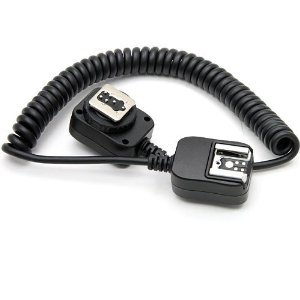
The one I bought is the DSLRKIT 2M E-TTL Off Camera Flash Sync Cord for Canon, it costs about £9 delivered.
Modifying the cable
It’s pretty straight forward but can be a bit a bit fiddly so lay out some paper to catch the tiny components and be prepared to solder if you’re clumsy like me.
You can probably use any TTL flash extender cable but this one was particularly good for trimming down to size.
As I’m sure all these cheap cables vary a bit (even if you order the exact one I did) I’ll just go through the general steps I took to make the ends lower profile, you can apply them to the cable you have, even if it’s not this one.
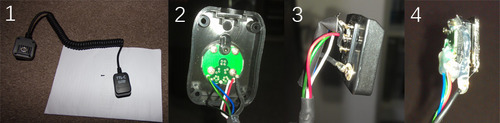
- Unscrew the small screws holding the two halves of plastic shell together (pic’ 1)
- The male end that goes onto your hot shoe is the most important, be careful removing the pins as they’re spring loaded so the springs and pins will fly out if you’re not careful (pic 2)
- My cable had a threaded locking wheel feature, I had to unscrew everything then saw this threaded bit in half to get it to fit in the housing
- I then needed to carefully cut the springs in half and re-place them with the pins in the – now shorter – guide holes before screwing the PCB back in place on top
- It’s the contact between the pins, springs and PCB that makes it work, it’s a very simple system that works just as well with half length springs and the original PCB, no need to solder anything unless a wire is detached somehow
- The female end that the transmitter goes into is a lot easier, I just had to unscrew the two halves and make a small cut in the top half so I could slide off the smaller plastic shoe section.
- Cover any exposed wire connections with glue from a hot glue gun, this will give it a bit of protection and hold the wires in place (pic 4)
Then you just wrap the cable around the lens, poke the end which will hold the transmitter through the lens hole, pop the other end into the hot shoe and close up your housing. I show you the way I do it in the video.
I find it easier to put the camera in first, then tape the transmitter to the under side of the lens and manoeuvre the port into place around the lens before screwing it on.
That’s the basic set-up, yours may vary depending on housing type and which triggers you’ve gone for, but I can vouch for this one working pretty well for me.
Getting the Shot
I’m yet to nail a nice flash shot, I’ve only tried it out twice and I can see the potential of the set-up, the important things I’ve picked up so far are the same as for the traditional remote flash shot: timing is critical, don’t shoot too early, and remember you only get two shots.

The main drawback with my design is the inability to adjust the flashes settings, with a pro set-up you can generally change settings on the flash and you get the benefit of TTL (Through The Lens) metering which I don’t understand really but basically it adjusts the flash power to give you the correct exposure for your settings.
Not having these luxuries I just pointed the flash away from the wave a bit to adjust the exposure, this is not ideal but I think with a bit of trial and error with the power level I could get a reasonable idea of what to use when.
I would suggest going with half power, if its darker you need less power, this is a bit counter intuitive, you have to realise that you’re fighting against the sunlight so it’s relative power that’s important, when it’s really dark you don’t need much to compete with the ambient light, if it’s still fairly light you need a whole lot more power.
Conclusion
If you take a lot of empty barrel shots, especially at dawn or in the evening, this is a great way to try out flash photography with your existing set-up, then if it suits you you can invest in the pro kit.
I am going to keep on trying it out but I’ve got a new project which involves a couple of interesting tweaks, if they work it could mean a much better budget option for in water flash shooting, when I get it worked out I will put another post up, likewise when I have figured out a few more settings issues with the existing rig.
Leave a Reply